Have you ever thought about how graphic designers make clear and attractive images?
The answer is a cutting mask. It’s a powerful tool that lets you choose which parts of one layer to show based on the shape of another layer. To work quickly in design programs like Photoshop and Illustrator, you need to know how to use cutting boxes.
Table of Contents
What is a Clipping Mask in Photoshop?
Clipping mask is an effective Design tool that catches the eye layer based on other layer shape or content. Basically, it hides sections of an image or element by using the shape of another layer as a boundary which only shows what stays inside the clipping layer.
What is a clip mask typically uses is for designers who want an image or text to appear as though it has an image inside of it and to achieve this cleanly, they need a clipping mask. It improves efficiency and accuracy in design processes. A multiple clipping path service is ideal for creating complex edits on images, such as adjusting colors or adding effects to specific sections.
Clipping Mask in Procreate
Procreate app that lets you create digital illustrations on iPads, intuitive but by default clipping mask option is not offered for the designers to keep their effects, textures or adjustments within confined areas without affecting the background layer.

It’s a great non-destructive tool for making illustrations more realistic or refined, and one beloved by digital artists.
Clipping Mask in InDesign
In Adobe InDesign, a clipping mask is an object used to combine with an image. To make a clipping mask:
- Add a image on the help of drawing tool
- Step 2: Select the shape and image
- Object > Clipping Path > Make
It is a great technique to make some special shapes and positioning the image specifically. InDesign has several clipping path preferences including catch edges, alpha channels or path purity for fine control. Image masking in Photoshop is a technique used to hide or reveal parts of an image by adjusting the transparency of specific areas
Clipping Mask in Photoshop CC
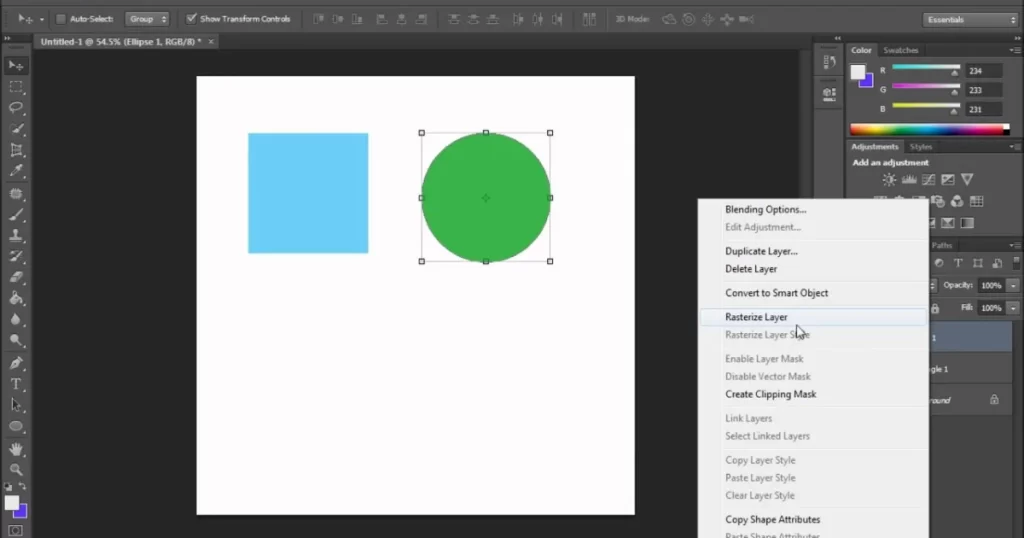
Making Clipping Masks in Photoshop CC or we can say adobe clipping mask. To start with, making clipping masks into the most basic yet versatile tool of all Adobe applications Photoshop:

- Place the layer that needs to be masked on top of the base layer.
- Now, to Clip the top layer to all the layers below it. Right-click on Top layer and click on Create Clipping Mask or Press Alt + Ctrl + G (Windows) / Option + Command + G (Mac).
Photoshop CC clipping masks are perfect for filling text with images or creating a gradient effect over part of an image. CC provides improved edge exposure and layer interaction for seamless results, inspiring detail and creativity.
Clipping Mask in Photoshop CS5
But there are no other warehouse images because Photoshop CS5 does not support the trendy clipping masks. To create a clipping mask:
- Position the mask layer under the layer which they are masking.
- Right-click the top layer and click Create Clipping Mask
CS5 lacks some newer features like smarter object manipulation but it still works to do the job of basic masks. But designers using CS5 should still be prepared to make some manual adjustments of edges for polished output. Image masking services are perfect for handling images with fine details like hair or fur, providing clean cutouts that standard clipping paths.
Clipping Mask in Photoshop CS6
There were additional minor enhancements to the way adobe CS6 handled clipping masks compared to CS5. The steps remain the same:
- Select the layer to be masked and then proceed to place it upon the base layer.
- To make the clipping mask, you can use Ctrl + Alt + G (Windows) or Command + Option + G (Mac).
Improved layer management tools in CS6 made it easier to manage layers as well as masked layers. It gets used a lot for text designs and composites. A clipping path service helps designers to isolate objects from their background, making it essential for e-commerce product images.
Clipping Mask in Pixelmator
Using Clipping Masks in Pixelmator. An Efficient Way For Mac Users.
- The mask should go under the content layer.
- Now right-clicking the first layer of content, go Create Clipping Mask.
Now, usually this is where a photo editing app comes in handy and luckily Pixelmator has an intuitive design that makes it simple to do this fast as well as preventing destructive boundaries with nondestructive editing. Clipping Mask is a common option for photo editing and shaped based designs and there are good alternatives to Adobe products.
Useful Advice on Clipping Masks
- Understand Layer Order: The ordering of layers is important To perform clipping, the mask layer should be well placed.
- This is a non-destructive process: You can employ clipping masks as they are non-destructive (never impacting the original content and you can always do all kinds of modifications later on if needed).
- Text Effects by filling text with images and patterns using clipping masks.
- Clipping masks are built-in Photoshop CC and above but with Smart Objects, you sort of create a separate design in an uncompressed format that gives more flexibility to the design than normal clipping does.
- Design-Saving: Clipping Masks are a faster way to create clipping masks which get time-consuming in a complex pattern.
At The End
A cutting mask is an important tool for controlling how visible a picture is in graphic design. You can make sure that only certain parts of a layer are shown based on the shape of another layer by linking them. This cuts down on time and makes patterns that look clean and professional. Mastering this skill will help you work faster and more accurately when you create.
FAQs
What is a clipping mask used for?
A clipping mask is used to control the visibility of one layer based on the shape of another layer. It allows you to “clip” the content of one layer to fit within the boundaries of the layer below it, creating precise shapes or effects without altering the original content.
What is a key difference between a clipping mask and a layer mask?
A clipping mask depends on the shape of another layer to determine visibility, while a layer mask works by adding transparency directly to a layer using a black-and-white mask. Clipping masks use stacking, whereas layer masks allow detailed pixel-by-pixel editing.
What does a clipping mask do in Illustrator?
In Illustrator, a clipping mask hides parts of an object or group of objects, displaying only what falls within the boundaries of a selected shape or path. It’s often used for creating complex designs or cropping elements into a specific shape.
What does a clipping mask do in Procreate?
In Procreate, a clipping mask confines a layer’s artwork to the boundaries of the layer beneath it. This is useful for adding textures, shading, or patterns precisely within a base shape without affecting the original layer.
Where is the clipping mask tool?
The location of the clipping mask tool varies by software:
1. Photoshop: Right-click the layer in the Layers panel and choose Create Clipping Mask.
2. Illustrator: Use the Object > Clipping Mask > Make menu or Ctrl+7/Cmd+7 shortcut.
3. Procreate: Tap the layer, then select Clipping Mask from the options.
What is a mask in Photoshop?
A mask in Photoshop is a tool that allows you to hide or reveal parts of a layer without permanently deleting pixels. By painting on the mask with black, white, or shades of gray, you can create transparency, blend layers, or apply non-destructive edits.