Combining shapes has always been a difficult task for people who are not related to the editing field.
Photoshop, as one of the best editing apps, provides us with some tools to merge shapes together.
Through this detailed discussion of how to combine shapes in Photoshop, you will be able to merge shapes according to your needs.
The tools and options that are used in combining shapes are present in Photoshop.
For example, Add, Subtract, Intersect, and Exclude. These options are used step by step to merge shapes. Now let’s begin with the discussion of how we can combine shapes in Photoshop.
Table of Contents
Quick Tools for Combining Shapes
Before diving in, let’s take a look at the essential tools in Photoshop that you’ll use for combining shapes. Here’s a helpful table summarizing them:
| Tool/Feature | Description | Shortcut |
|---|---|---|
| Shape Tools | Create basic shapes like rectangles, circles, or custom shapes. | U |
| Pathfinder Options | Combine, subtract, or intersect shapes. | Found in Options Bar |
| Move Tool | Move and position shapes accurately. | V |
| Layer Panel | Organize and manage shape layers. | F7 |
| Merge Shapes | Combine multiple shape layers into one. | Right-click on layers |
Open Photoshop and create a new document where you can easily combine shapes. Click on the “File” menu and then go to the “New” option.
Note one thing that if you are selecting an image with no lipstick or want to totally change the color of your lips, you will have to do some additional editing. For this purpose, you have to set hue/saturation adjustments.
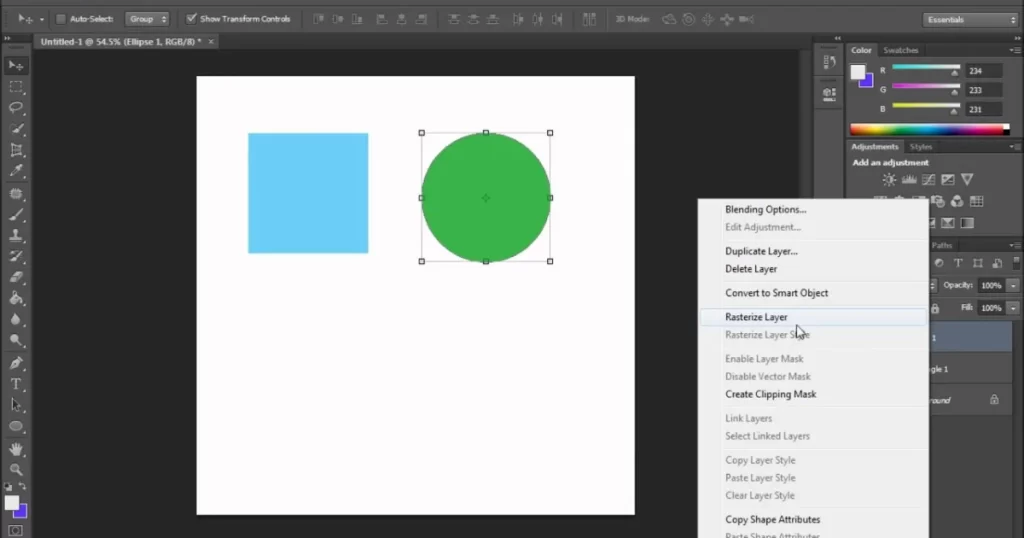
Step 2
Now draw any kind of shape. For drawing shapes, go to the “Ellipse Tools” and click on any shape like circle, square, or rectangle.
Drag out the shape with the help of “Alt” to make a perfect shape. Hold the “Alt” key until the exact shape appears.
It is important to maintain layers between the shape and its background. Go to the Layers panel and make sure that your document has two layers one for background and the other for the shape.
As we are trying to combine shapes, we will be doing the same process to add another shape. Keep selecting the “Ellipse tool”. Insert the shape as it will partially overlap the previous one.
For example, if you selected a circle at first, you would be adding another circle and get an overlapped new shape.
There is a point to ponder: that is the Layers of both the shapes are separate from each other.
To check this out, go to the Layers panel again and see you will get a Layer 2 for the second shape right above the first one.
Overlapping shapes does not mean the layers will get merged. They will always be separate. Each of the shapes will have its own Shape layer.
Here you are done with simply combining two similar shapes. As i told you that shape layers should be there and if you do not find layers in the Layers panel, go back to the document and click on the Create New Shape Layers that is present on the very left side of the Paths and Fill Pixels options. Normally, this option is already selected by default.
Now, we can also get some other combined shapes by adding, subtracting, intersecting, and excluding different areas of a shape or two shapes.
For example, the shapes you combined above have an overlapped area. You can subtract that overlapped area and get a new combined shape.
For this process we will be using some options present on the middle upper side of the window.
Add to Shape Area
Adding to the area of a shape will change the default settings of the document.
For example, if you click on the “Add to Shape Area” option, the shape layers will be removed, meaning any new shape will be added to the same area without having its own shape layers.
Select a shape from the “Ellipse Tool” menu. Click on the add to shape area option from the options bar.
You can also delete shape 2 that was added before by dragging it to the Trash Bin.
It will appear with the original shape with a background layer below the shape 1.
After doing so, just check and confirm that your shape 1 has “vector mask thumbnail”.
A white highlighted margin will be shown around your shape 1 that confirms the selection of vector mask thumbnail.
If you are not seeing any kind of highlighted border on your shape, it means you did not put the vector mask thumbnail to the shape.
To apply this, go to the thumbnail option and click on it. The vector mask thumbnail will tell you the look of your shape and swatch color will recognize the color of the shape.
Another important function of “vector mask thumbnail” is to provide you with the options of add, subtract, intersect, and exclude to a shape area. Otherwise, these options will be disabled from the bar.
So, to combine shapes, these options are very important. That’s why the vector mask thumbnail selection is required.
After having the vector mask thumbnail, click on the “Add to Shape Area” and a + sign will appear.
It is usually present on the lower side of the cursor which tells us that any new shape will be combined to the existing one without having a separate shape layer.
Now, add another shape from the Ellipse tool that will overlap the existing one. The result will be similar to the above one but in the Layers panel, both the shapes will appear in one layer. The path lines will also be visible here.
To remove the path lines, all you need to do is to deactivate the vector mask thumbnail. Click on the thumbnail option and remove the vector mask. After doing so, you will see no path lines. It will bring a difference between this and the earlier one.
Now you have a new combined shape without multiple layers and paths.
Subtract from Shape Area
As we have deactivated the vector mask thumbnail, the subtraction option is unavailable. Reactivate the thumbnail following the previous steps. You will get the options in the bar again.
Choose a shape from the “Ellipse Tool”. Go to the options bar and select the “Subtract from Shape Area” option.
You will get a minus (-) sign below your cursor. It means that any other shape that will be added to the existing shape will remove a part of the existing shape.
Add another shape that will be overlapping the existing one in the same way.
But, this time we will get a different result. The new shape and the overlapped area will be invisible. Only path lines will only be shown.
Go to the layers panel and see both the shapes are existing in the same Shape Layer. Again, you need to remove the path lines. Disable the vector mask thumbnail to remove path lines.
You will get a new shape by removing some area from the shape.
Intersect Shape Areas
To intersect some area of a shape, an option is given in the option bar. Select a shape at first.
The option bar will be unavailable because we have deactivated the vector mask thumbnail again. Activate it and select the “Intersect shape areas” option.
You will get x below the cursor on the right side. It means you can intersect a part of an existing shape by adding a new shape. Select another shape that will again overlap the existing one.
Only the intersected part will be visible. Now remove the path lines to get a new shape with an intersected part. Remove the vector mask thumbnail and get a new shape.
Exclude Shape Areas
We will continue with the overlapped shapes. Follow the same steps and select the “Exclude Shape Areas” option from the bar. An x will appear within a small circle below your cursor.
Now add another shape. The overlapped area will disappear but the path lines will be visible.
Remove these path lines by deactivating the vector mask. You will get a new combine shape again.
Sometimes , we get something else in our minds and we want to change or delete the shapes from the document. Now, as we have added the same Shape Layer to both of the shapes, it will be difficult to change or remove it.
The whole document will get messed up. The reason behind this is that both the shapes are existing in the same layer. But, in Photoshop, we get the option to change or delete a shape.
We can also switch between the modes of selection. Like, if we want to change Subtraction mode into Addition mode, we can also do this.
Go to the Path selection tool and click on the arrow. Now select the second shape and click on the mode you want to add from the option bar.
If you want to entirely delete a shape that is added to the existing one, it can also be possible with the Path Selection Tool.
select the shape as we did before and press Backspace from your keyboard. The selected shape will be deleted easily without deleting the whole shape.
Hence, this is the whole process we need to follow to combine shapes in Photoshop. Circles, squares, rectangles, triangles, and many more shapes are combined together to form a new shape.
Then, some of their parts are added, subtracted, intersected, or excluded to have more interesting shapes. Today, it is not a big deal to play with shapes and combine them.
Macbook
To combine shapes in Photoshop on a MacBook, follow these simple steps:
Open Photoshop: Launch Adobe Photoshop on your MacBook.
Create or Open Document: Create a new document or open an existing one where you want to combine shapes.
Select Shape Tool: Choose the Shape Tool from the toolbar. You can find it by clicking and holding the Rectangle Tool icon, then selecting the desired shape (e.g., rectangle, ellipse).
Draw Shapes: Click and drag on the canvas to draw the shapes you want to combine. You can draw multiple shapes using the same tool.
Arrange Shapes: Arrange the shapes as desired on the canvas. You can move, resize, or rotate them using the Move Tool (shortcut: V).
Select Shapes: Hold down the Shift key and click on each shape layer in the Layers panel to select multiple shapes.
Combine Shapes: With the shapes selected, go to the “Layer” menu, navigate to “Combine Shapes,” and choose from options like “Union,” “Subtract,” “Intersect,” or “Exclude Overlapping Shapes” to achieve the desired result.
Fine-Tune and Edit: After combining shapes, you can fine-tune the result by adjusting the layer blending modes, opacity, or applying layer styles.
Save Your Work: Once you’re satisfied with the combined shapes, remember to save your work to preserve the changes.
Conclusion
Combining shapes in Photoshop is a fantastic skill to add to your toolkit, whether you’re designing logos, creating digital art, or experimenting with new ideas. By using tools like Pathfinder options and shape layers, you can quickly create complex and unique designs with ease.
So, grab your Shape Tool and start creating today! If you have any questions or want more Photoshop tips, drop them in the comments below.
In the competitive world of e-commerce, high-quality product photography can make or break a sale. With the rise of mobile shopping and the visual nature of social media, capturing your products in the best light is crucial to success.
In 2024, advancements in technology and shifting consumer expectations are pushing the boundaries of what great product photos should look like.
This blog will explore the best tips for e-commerce product photography that will help you boost your sales and attract more customers to your online store.
Understanding Your Product and Audience
Effective product photography begins with a deep understanding of both your product and the people you’re trying to reach. Here’s why it’s so important:
Know Your Product Inside Out
To capture your product in the best light, you need to know it inside and out. This means understanding its features, materials, and what makes it special.
When you know your product well, you can highlight its most attractive aspects in your photos, making it more appealing to potential customers.
Understand Your Target Audience’s Preferences and Expectations
Your audience’s preferences and expectations should guide your photography decisions. Take the time to research who your target customers are, what they like, and what they expect from your product.
By understanding your audience, you can tailor your photography to resonate with them, increasing the likelihood of engagement and sales.
Tailor Your Photography Style to Match Your Audience’s Taste
Once you know who your audience is, you can adjust your photography style to appeal to them. Consider factors like age, gender, lifestyle, and cultural background when choosing how to showcase your product.
By aligning your photography style with your audience’s tastes, you can create images that capture their attention and drive them to make a purchase.
Importance of High-Quality Product Photography
Let’s talk about why taking great pictures of the stuff you want to sell online is so important!
Imagine you’re shopping online for a new toy or a cool t-shirt. What’s the first thing you notice? Yep, you guessed it – the pictures! Good pictures can make a toy look super fun or a t-shirt look super cool.
When you take awesome pictures of your stuff, it helps people see how awesome it is! They can see all the cool details and colors, just like they would if they were holding it in their hands. And when they see how awesome it looks, they’re more likely to want to buy it!
So, if you want to sell your stuff online and make lots of people say, “Wow, I need that!”, taking high-quality pictures is the way to go!
Tips for E-commerce Product Photography
Great product photography is essential for the success of any e-commerce business. Here are some tips to help you capture stunning product images that will attract customers and increase sales:
Use Good Lighting
Proper lighting is crucial for capturing high-quality product images. Natural light is ideal, but if that’s not possible, invest in lighting equipment such as softboxes or umbrella lights to create a well-lit and shadow-free environment.
Use a Neutral Background
A clean, simple background allows your product to stand out and ensures that the focus remains on the item you are selling.
A white or light grey backdrop is commonly used for e-commerce product photography.
Invest in a Good Camera and Lens
While smartphones can take decent photos, investing in a good quality DSLR camera and a sharp lens will significantly improve the quality of your product images.
Consider a macro lens for close-up shots and a wide-angle lens for capturing larger items.
Use a Tripod
A tripod helps stabilize your camera and ensures sharp, steady images. This is especially important when shooting in low light conditions or when using slower shutter speeds.
Focus on Details
Customers want to see every detail of the product before making a purchase. Capture close-up shots of textures, patterns, and fine details to give potential buyers a clear idea of what they are getting.
Keep It Consistent
Consistency is key in e-commerce product photography. Use the same lighting setup, background, and styling for all your product images to create a cohesive and professional look across your product catalog.
Edit carefully
Post-processing is an essential part of product photography. Use editing software like Adobe Photoshop or Lightroom to adjust exposure, color, and sharpness to enhance your images while ensuring they remain true to the actual product.
Setting Up Your Photography Space
Creating a good place to take pictures of your cool stuff is super important. Let’s make it easy!
Choose a Bright and Tidy Spot:
- Find a place with lots of light. Light helps make your pictures look clear and bright.
- Make sure the space is tidy and clean. You don’t want any messes in your photos!
Use a Nice Background:
- Pick a background that makes your stuff stand out. It could be a plain color or something fun like a pattern or texture.
- Make sure the background isn’t too busy or distracting. You want people to focus on your stuff, not what’s behind it.
Set Up Your Stuff and Camera:
- Put your stuff on a table or flat surface. Make sure it’s steady so it doesn’t move while you take pictures.
- Get your camera ready. If you’re using a phone, make sure it’s charged and has enough space for lots of awesome pictures!
Editing and Retouching Tips
Editing your pictures can make them even cooler! Here are some easy tips:
Brighten Up Your Photos:
- If your picture looks a bit dark, you can make it brighter. Just adjust the brightness setting until it looks just right!
Fix Mistakes:
- Sometimes, there might be things in your picture that you don’t want, like a smudge or a spot. You can use the eraser tool to get rid of them.
Make Colors Pop:
- Want the colors in your picture to really stand out? You can adjust the saturation to make them look brighter and more vibrant.
Keep It Natural:
- When you’re editing your pictures, try to keep them looking natural. You want your stuff to look awesome, but still real!
Conclusion
In the end, taking awesome pictures of stuff you want to sell online is super important! By following these tips, you can make your products look amazing and catch the eyes of lots of people who want to buy them.
Remember to find good lighting, use a clean background, and show off all the cool details of your products. Keep your pictures looking neat and consistent, and don’t forget to have fun while you’re snapping away!
So, grab your camera or smartphone, and get ready to take some awesome photos that will make your products stand out in the online world. Happy photographing, and may your sales soar high!
Frequently Asked Questions
What equipment do I need for product photography?
You don’t need an expensive camera to take great product photos. A high-quality DSLR or mirrorless camera is ideal, but many smartphones in 2024 offer excellent camera capabilities as well.
Along with your camera, invest in a tripod, good lighting (such as softboxes or a lightbox), and a clean background. For best results, consider using a lens with a shallow depth of field to focus on your product.
How can I make my product photos stand out from competitors?
To stand out, focus on composition, lighting, and consistency. Use creative angles, make sure your lighting is flattering to the product, and ensure the background doesn’t distract from the main item. A consistent editing style across your images also creates a cohesive and professional look that enhances your brand identity.
Can I take product photos using my smartphone?
Yes! Modern smartphones, such as the iPhone 14 or Google Pixel, have excellent cameras that are capable of producing high-quality product images. Just make sure you use a tripod to keep the phone steady, take advantage of natural light, and pay attention to your compositions. Editing apps can further help enhance the quality of your photos.
What is the best way to edit my product photos?
Editing your product photos is essential to make them look polished. Basic adjustments include correcting the exposure, adjusting the contrast, and ensuring color accuracy. Use tools like Photoshop, Lightroom, or Canva to remove blemishes and create consistency across your images. Don’t over-edit; aim for a natural, true-to-life look that accurately represents your products.
How do I optimize product photos for my online store?
To optimize photos for e-commerce platforms, ensure that they meet size requirements for each platform (Shopify, Amazon, etc.) and are compressed for fast loading times. Use high-quality file formats like JPEG or PNG, and make sure the images are clear and sharp. Don’t forget to use alt text and descriptive file names for SEO purposes.