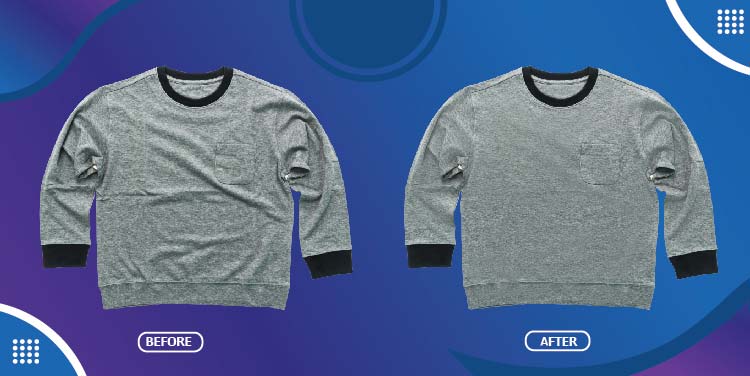
Tired of fabric creases ruining your perfect shot? Remove wrinkles from clothes easily with just a few clicks! In this tutorial, we’ll show you how to remove wrinkles from clothes in Photoshop using the best wrinkle remover tools. Whether you need an instant wrinkle remover or want to learn how to remove wrinkled clothes professionally, this guide is for you.
Photoshop and cloth wrinkle removal are like two hands of the same body. Original photos have many problems like wrinkles, folds, and shadows that need fixing to make the cloth look smooth and nice. The common issues in clothes photos are ugly creases, bad light, wrong colors, and dirty spots.
There are many free apps in the Play Store and App Store for editing photos. But their editing is not as good as the professional Photoshop service. This is because pro editors use expert skills and the best software with many tools. They edit every small part by hand, making sure the cloth looks perfect. You must zoom in and work slowly for the best results.
Table of Contents
How to Remove Wrinkles From Clothes in Photoshop
Beginners can use the spot healing brush first, just clicking on wrinkles. This is an easy way to fix small folds fast.
To fix wrinkles from clothes using the Patch Tool, simply select the area and drag it over a smoother section for a clean result. Make sure to work on a duplicate layer to preserve your original layer in case you need to revert changes. Adjust your brush size depending on the detail level required, especially around folds or seams. For a more polished finish, apply a Gaussian blur subtly to even out the texture. You can also enhance the result with Color layers to correct any mismatched tones and blend everything naturally.
Changing opacity and flow settings can also help to make fixes look real. High resolution, low resolution, or medium quality photos will need different ways to edit. Always check before and after by pressing undo or using the history panel. Small changes can make big improvements if you take time to practice.
Step 1: Open the Image

First, you gotta open your photo in Photoshop. Just click “File” then “Open” and pick your wrinkled pic. If you don’t see your photo, maybe you clicked the wrong folder. Check again.
Now your pic is open, zoom in to see wrinkles better. Use the magnify tool or press “Z” on the keyboard. Don’t zoom too much, or it looks weird. Just enough to see the creases good.
Next, pick the “Spot Healing Brush” from the toolbar. It looks like a band-aid. Click on wrinkles and Photoshop will magic them away. If it does not work well, try the “Clone Stamp” tool instead. Hold the “Alt” key and pick a smooth cloth part, then paint over wrinkles.
After you fix all the wrinkles, save your photo. Go to “File” then “Save As” and choose JPEG. Now your clothes look perfect, no iron needed!
To start editing, ensure the background layer is unlocked and not set to invisible. Use the selection tool to isolate the area you want to fix, then apply a Layer Mask for non-destructive edits. The Healing Brush Tool is especially useful for removing wrinkles from clothes, and you can enhance results further using advanced techniques. Always remember that working with the Healing Brush Tool helps maintain texture consistency.
Follow these steps, and your pics will look pro. No more ugly wrinkles, just smooth clothes like in magazines. Happy editing!
Step 2: Select the Wrinkled Area

To achieve clean edits for professional purposes, start by using the eye icon to toggle layer visibility and ensure you’re working on the correct version, separate from the original. Adjust settings in the options bar to fine-tune your tools. When smoothing out wrinkles in clothing, the liquify tool can be very effective. Always check the dialog box when applying filters to confirm changes and maintain control over the editing process.
First thing is to find all the wrinkles you want to fix. Use the “Lasso Tool” that looks like a rope in the tools panel. Click and drag around wrinkly parts carefully. If you pick too much, press “Alt” and click to take off extra bits.
Selecting the right one is a very important step. If you miss some wrinkles, the clothes still look messy. If you pick too much, the fabric looks fake and weird. Zoom in close to see all the small creases, good. Shadows can hide wrinkles, too, so look at all angles.
After selecting good, go up to the “Filter” me, nu then pick “Blur”, then “Smart Blur”. This magic tool makes wrinkles go away but keeps the skin looking real. Move the sliders a little bit till it looks smooth but not plastic. If some wrinkles stay, use the “Patch Tool” to fix the last spots.
When happy, press “Ctrl+D” to stop selecting. Now clothes look just like iron! Save your work and feel proud. These edits make photos look pro that you can keep forever, not like quick phone pics that get lost.
With little practice, you make all the clothes in photos look perfect. Good edits last a long time, just like good memories from special times!
Step 3: Use the Healing Brush Tool

You should try different brushes to fix wrinkles in clothes, like a soft brush, a hard brush, or a smudge tool. Clicking, dragging, and zooming are the basic steps. These simple steps can make big changes if you mix them right. Guys can use the healing brush, keeping pressure light. This is an easy way to remove wrinkles fast.
To create flawless images for e-commerce and product images, it’s essential to work with high-quality images from the start. When dealing with apparel images, make sure to enhance the entire image to maintain consistency. Many professionals convert images into web-optimized formats to ensure fast loading without sacrificing quality. For standout results in online stores, always aim for high-quality product images, as E-commerce Images play a crucial role in attracting customers.
Step 4: Apply Patch Tool

To create professional images, start by opening a sample image or your original image using the File option. Then, go to the Image menu and adjust the necessary settings to enhance the quality. Always select the Image carefully before applying any edits. With the right image editing tools, you can transform a basic photo into a perfect image suitable for any professional use.
Patch tools can fix these problems and make clothes look nice and neat. Even if the patch tool is mostly for big fixes, it doesn’t mean small wrinkles don’t need it. A little use can make fabric better, like copying good parts to cover bad spots.
There are various sorts of images available online, including tons of images showcasing clothing wrinkles and wrinkle-free images. For those seeking professional results, apparel wrinkle removal services can help eliminate even the deepest wrinkles, making photos look polished and appealing. Whether you’re using a clothing wrinkle reference or aiming for eye-catching wrinkles in fashion photography, techniques like Frequency Separation and Smooth wrinkles can significantly enhance image quality.
Step 5: Utilize the Clone Stamp Tool

If you’re dealing with ugly wrinkle issues in photos, a good tutorial on wrinkle smoothing can help you tackle everything from minor wrinkles to prominent wrinkles. Whether it’s an isolated wrinkle or stubborn fabric wrinkles, the right technique can remove even the simplest wrinkles with ease. For more pronounced wrinkles, you may need advanced toolsbut don’t worry, even frustrating wrinkles can be fixed with practice and precision.
Clone stamps work best when you pick a good spot to copy from. Press the Alt key to sample nice parts of fabric, then paint over bad wrinkles. Standing close to an area or zooming in helps do a better job. You can also fix small spots near edges or buttons by copying from the other side of the shirt.
For hard parts like the collar or pocket, use a small brush size and go slow. Big brushes make a mess and look fake. Remember to change the sample spot often so the texture does not get weird. Dark clothes need more care than light ones because mistakes show more easily.
Step 6: Smooth with Gaussian Blur

Gaussian blur is the best tool for making fabric look soft like clouds. Even if your clothes have lots of wrinkles, this blur makes them disappear like magic. Most people use blur for faces, but it works well for clothes, too.
For effective wrinkle removal, start by keeping the layer visible and work with a middle layer to preserve details. Use wrinkle-smoothing methods that target unseemly wrinkles without damaging the texture.
Techniques like working on a low-frequency layer can help smooth out imperfections while maintaining sharpness. Adding extra Layers allows non-destructive edits, and adjusting the Layer blending mode or layer mode helps integrate changes seamlessly into the image.
In the e-commerce business and online business, presenting a smooth fabric texture and a smoother texture in product photos is essential to attract customers. Using the selection Feather option can help blend edits naturally, while applying filters from the Filter dropdown menu or filter menu enhances image quality without distorting clothing shapes.
Maintaining a pleasing shape within a reasonable time frame ensures efficient time in editing and high-quality results that boost sales.
For best results, pick a small area first to test. Use a slider to change how strong the blur is. Wrinkles on dark clothes need less blur than light ones. Remember, blur makes everything soft, so don’t use buttons or pockets!
Step 7: Fine-Tuning with the Liquify Tool

After clone stamps and blur, sometimes clothes still have a few problems. The liquify tool helps fix these last bits to make them perfect. You can push and pull fabric like Play-Doh to smooth wrinkles that other tools miss.
Creating amazing photos often requires overcoming common photo editing challenges, especially when working with team photos or clothing photos. To enhance a professional photo, make sure all visible layers are properly adjusted during photo retouching. Whether you’re fixing issues from a recent photo shoot or handling tedious photo edits, sharpening your photo editing skills is essential for producing polished, high-quality results.
For best use, pick a small brush size and go slow. Big brushes mess up the whole shirt fast. Girls’ dresses with flowy parts need gentle pushes. Guys’ shirts with buttons need care near the edges. The tool works well for fixing collars that stick up weirdly or hems that curl the wrong way.
Step 8: Final Adjustments

Successful photo editing often involves addressing wrinkles in clothing photos, especially when dealing with creased clothes. One of the key steps is using the Healing Brush or Spot Healing Brush tool to blend imperfections seamlessly. Start with a soft brush and follow simple steps for natural-looking results. You can also try the mixer brush tool for smoother textures. Whether you’re using the Healing Brush Tool from Photoshop or any other software, following a clear step guide or step process with detailed steps will help you tackle even the most stubborn wrinkles effectively.
First, check if the colors look right. Sometimes when fixing wrinkles, colors get a little washed out. You can use the ‘vibrance’ tool to make colors pop again, but not too much or look fake! For white shirts, you might need to remove yellow tints with color balance.
Next, look at the whole picture zoomed out. Maybe some spots you missed? Use a zoom tool to check all areas. Compare the original photo to see how much better it looks now!
The last step is to save your work. Always save as a new file name so you don’t lose the original. Now you have a perfect wrinkle-free clothes photo ready to show everyone!
Why Do You Need to Remove Clothing Wrinkles For E-commerce Images?
Smooth clothes make product photos look more professional. Wrinkles on clothes in online store pictures make customers think the item is old or used. When clothes look neat and crisp, people want to buy them more.
In product photography, especially apparel photography and fashion photography, removing wrinkles in clothes or fixing wrinkly clothes is crucial for a polished look. Using the Option key and Source option in tools like the Healing Brush enhances control during retouching.
For modeling photography, advanced editing techniques such as the frequency separation technique are popular, a high-level technique widely used. Applying a light Blending option can also help smooth out imperfections subtly. These are all popular options for achieving flawless results in professional fashion edits.
A professional photographer, whether a freelance photographer or a 360-Degree Product Photographer, often relies on tools like Adobe Photoshop to perfect images. Using the Blur sub-menu, you can adjust the blur radius to smooth areas without losing the original pixels’ detail.
Working in the Layers panel helps keep layers intact and maintain the image’s color layers. Techniques such as the Patch Tool Method allow for precise editing by sampling pixels and adjusting values for pixels, ensuring clean, flawless results even in Photoshop versions like Photoshop.
Good product shots have clothes hanging straight or lying flat without wrinkles. This makes shoppers trust quality and imagine how an item will look when they wear it. Simple fixes in Photoshop can make cheap clothes look expensive by just removing messy folds!
FAQ
How can I remove wrinkles from clothes in Photoshop?
Use tools like the Spot Healing Brush, Clone Stamp, or Frequency Separation to remove wrinkles from clothes in Photoshop seamlessly.
Is there an instant wrinkle remover in Photoshop?
Yes, the Spot Healing Brush acts as an instant wrinkle remover for quick touch-ups on fabric.
What’s the best wrinkle remover tool in Photoshop?
The Clone Stamp Tool and Healing Brush Tool are considered the best wrinkle remover tools for natural-looking results.
Can I remove wrinkles from clothes without Photoshop?
Yes, but for the cleanest digital results, Photoshop remains the most effective way to remove wrinkles from clothes.
Final Thoughts
Let Cutout Image Media professionally remove wrinkles from clothes in your photos with precision and speed. Get flawless edits today. Try our instant wrinkle remover service now!
You can use tools in Photoshop to make clothes look smooth and have no wrinkles. Not all tools work the same, you pick the one that matches your skill and time. If you are a beginner, using the “Spot Healing Brush” is easy and quick. If you are pro, use “Clone Stamp” for more control. Practice makes perfect. Try different tools to see which one you like. Soon, you will remove wrinkles fast like a pro in 2025!